
How to deploy a Slack bot to allow anyone in your team to quickly raise major incidents on Zenduty
Last updated
One of the biggest challenges for some of our customers was allowing non-engineering teams, such as Support, Sales, or Customer Success teams, to raise incidents for specific Dev/Infra/Security/Ops teams on Zenduty in a structured and efficient manner as soon as a customer reports an issue. In many organizations, we observed that non-technical team members often needed to switch between platforms, fill out complex forms, or reach out to multiple stakeholders manually to ensure that an issue is escalated. This process was time-consuming and chaotic, leading to delays in response times, miscommunication, or even missed incidents. This lack of a streamlined process often resulted in confusion, leaving engineers scrambling to gather the necessary information while critical issues remain unresolved. Another challenge was that team owners did not want to pay for extra seats on Zenduty for users who are simply reporting incidents (and are not necessarily using Zenduty to its fullest extent).
Without a clear mechanism for non-devs to raise incidents, teams might resort to informal channels like email or Slack/Teams direct messaging, which further complicates tracking and accountability. This scattered approach not only wastes time but also makes it difficult to prioritize and handle incidents based on their severity. As a result, it becomes challenging for engineering teams to respond effectively, leading to increased downtime and potential customer dissatisfaction. The need for a seamless, integrated solution to allow non-devs to raise incidents efficiently was the need of the hour for maintaining operational efficiency and ensuring rapid incident resolution.
We recently released our open source custom Slack bot that is now used by several of our customers to raise incidents within Slack easily using a simple Slack command. In this tutorial, we'll show you how to create a Slack bot that lets you raise incidents in Zenduty with a simple command. No more scrambling through multiple tools and channels to report an issue - just type, send, and watch the magic happen.
Prerequisites
Before we start, ensure you have the following:
- Node.js and npm installed. We recommend using nvm for managing Node.js versions.
- A Slack workspace with the ability to create and manage apps.
- A Zenduty account with API access.
Know before you read
Before you dive into this tutorial, ensure you have the following prerequisites:
- Knowledge of how a web server works: You should be familiar with the basics of web server functionality, including handling requests and responses.
- Experience with Node.js: Understanding Node.js, its asynchronous nature, and its module system is essential.
- Proficiency in JavaScript: Since this tutorial involves writing JavaScript code, you should be comfortable with the language, including ES6+ features.
Let's get started!
Project setup
- Create a new directory for your project and navigate into it:
mkdir slack-zenduty-bot
cd slack-zenduty-bot
- Initialize a new Node.js project:
npm init -y - Install necessary dependencies:
npm install @slack/bolt axios dotenv
For this tutorial, we'll use Slack's Bolt.js framework to streamline the process of building applications on Slack.
What you will build
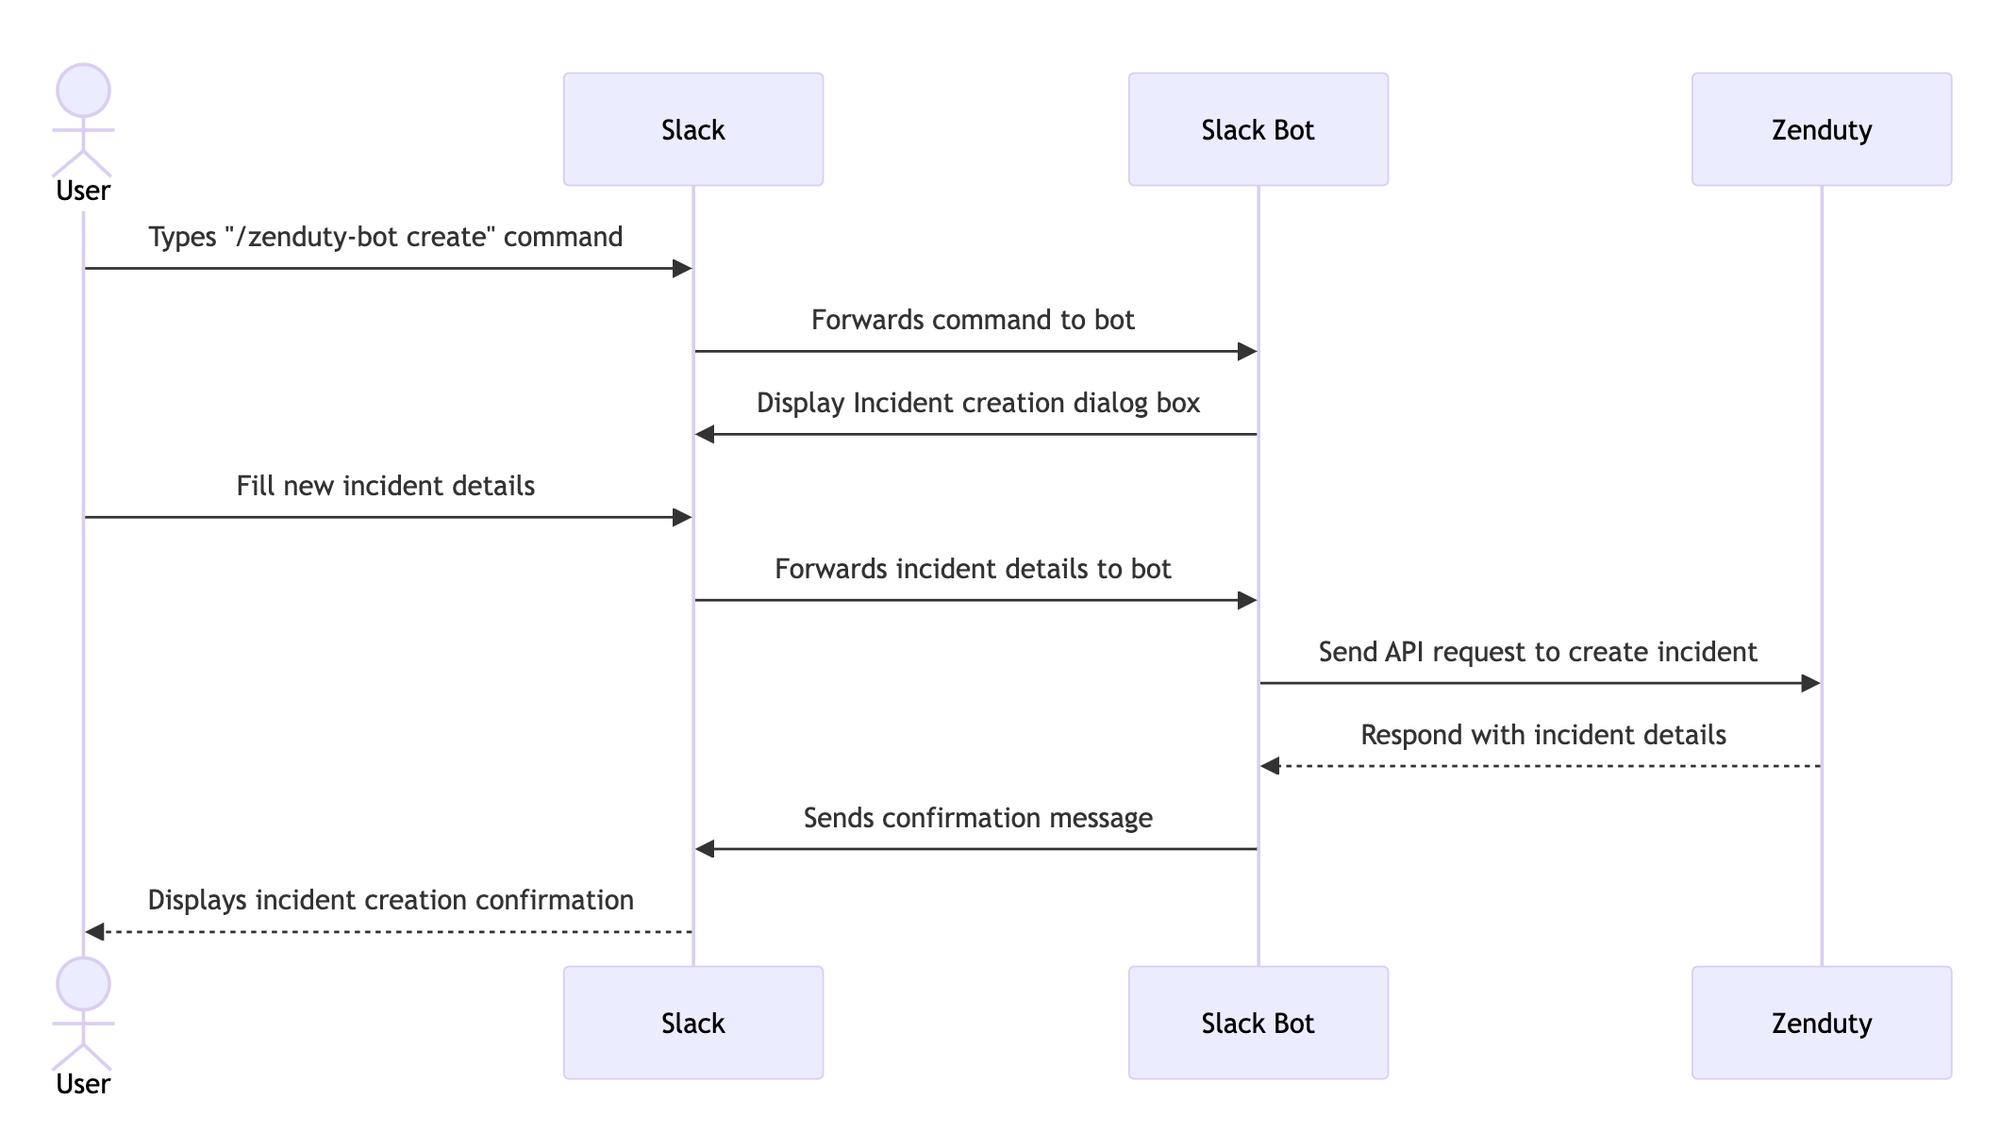
By the end of this tutorial, you'll have a fully functional Slack bot that responds to slash commands, displays a modal for incident creation, and communicates with Zenduty to create and track incidents:
- When a user types the command /zenduty-bot create in the message box on Slack, your bot will display an interactive modal within Slack. This modal will allow users to fill in details about the incident they want to create.
- The bot will capture the information entered in the modal, send it to Zenduty via their API, and create a new incident.
- Once the incident is created, the bot will send a confirmation message back to the Slack channel, ensuring that the team is aware of the new incident.
Here's a sequence diagram showing how this bot will work in action:
Step 1: Setting Up the Slack App
Before diving into the code, we need to set up a Slack application that will act as the bridge between Slack and Zenduty. This step involves configuring the necessary settings and permissions for our Slack bot to operate. Here's how you can set it up.
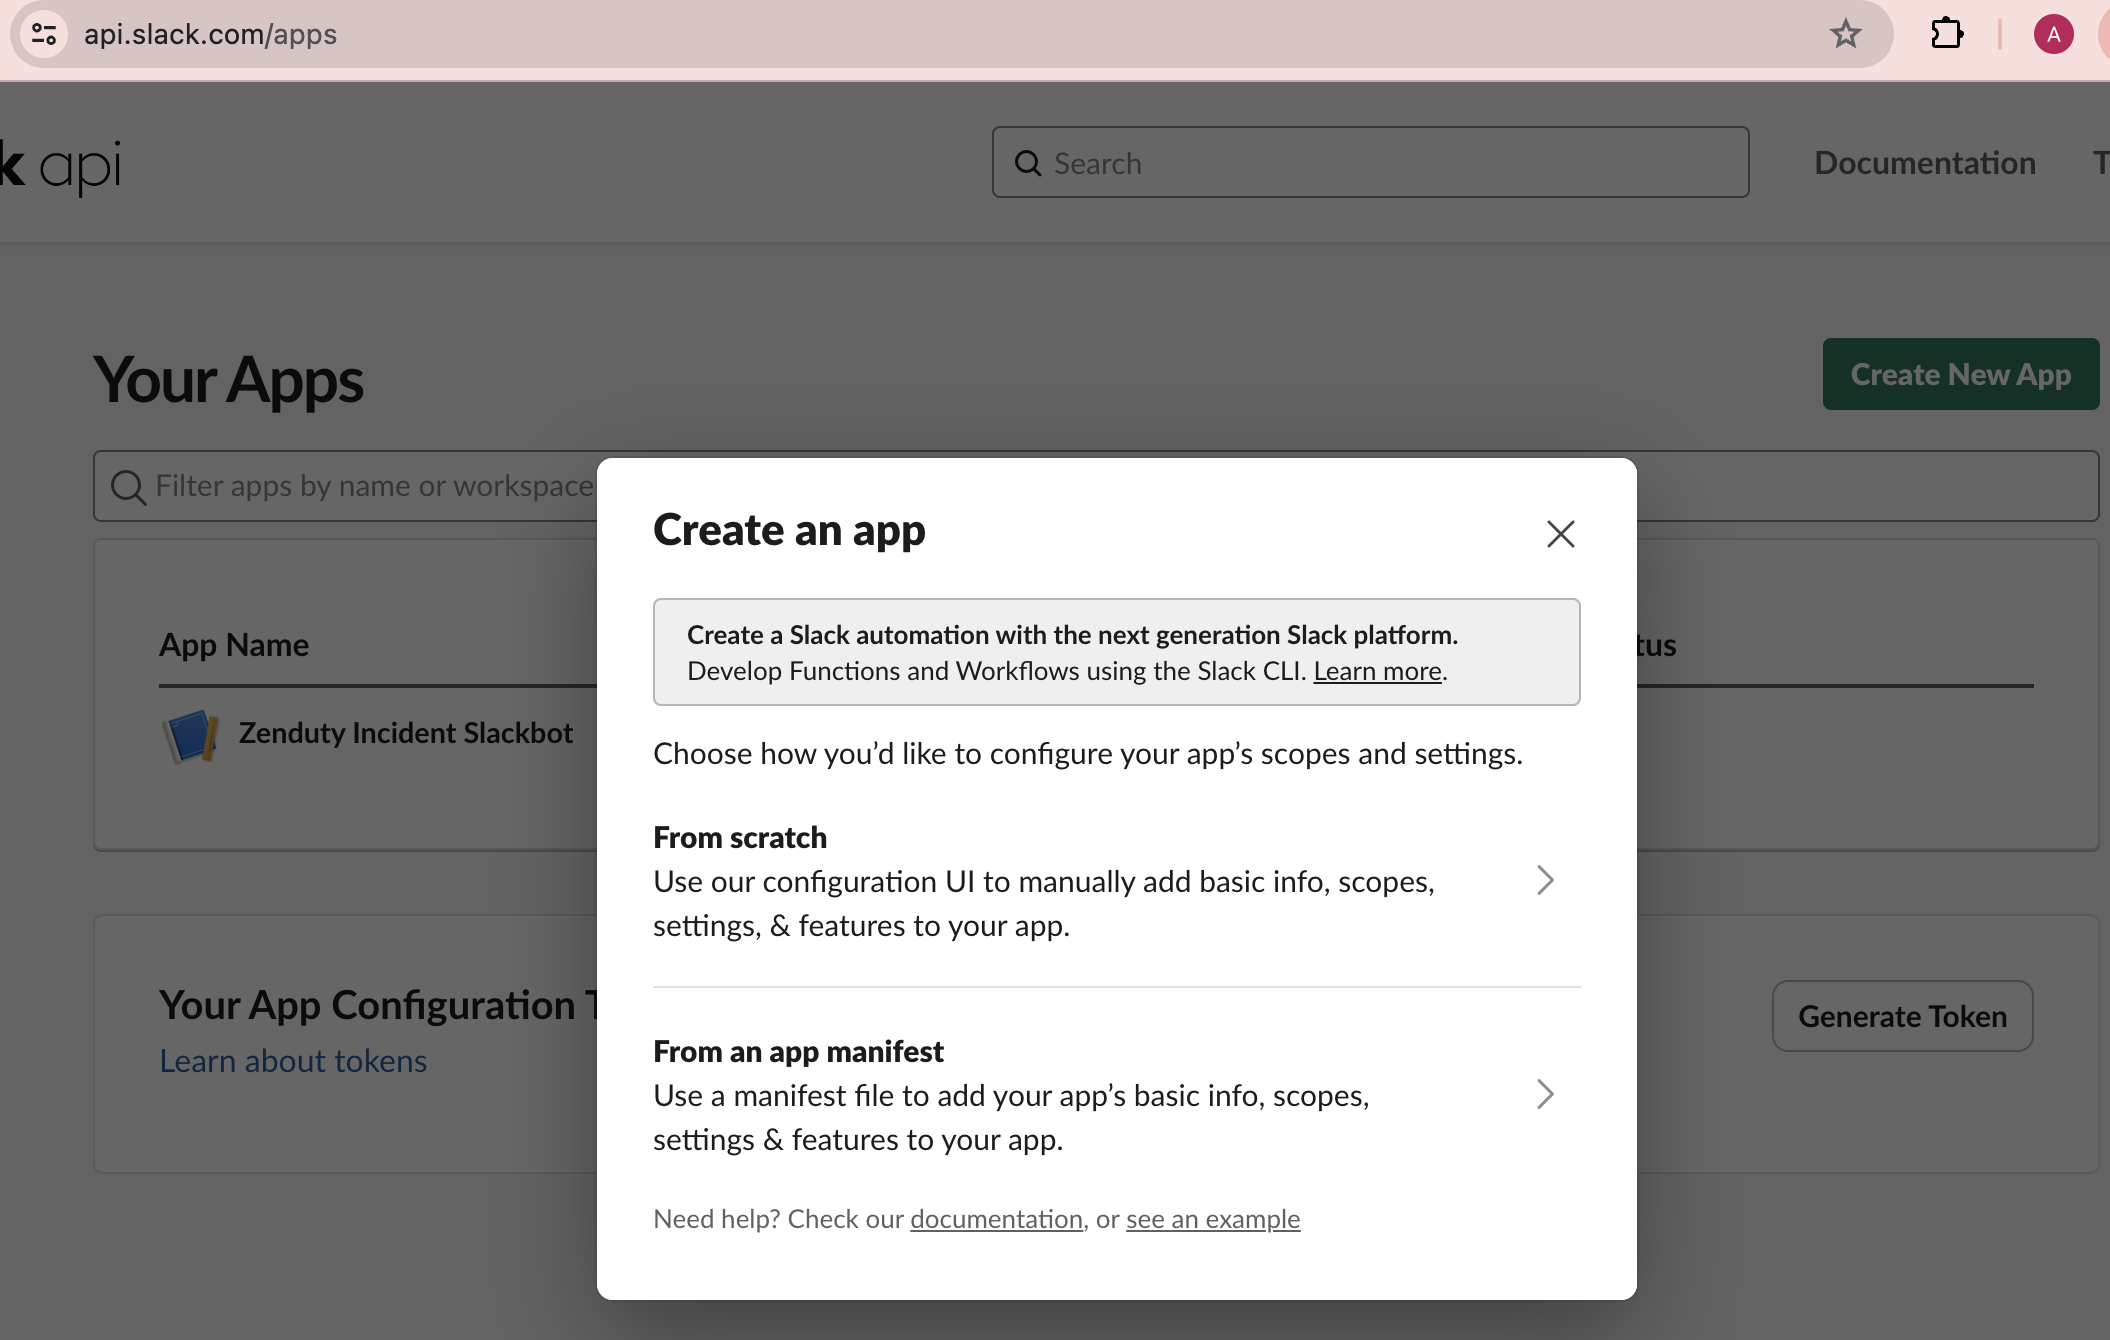
Creating a Slack App
Go to the Slack API website and create a new app. Next, select the option "From an app manifest".
Configure the App Manifest
The app manifest is a YAML or JSON file that defines the configuration and capabilities of your Slack application. This file includes all the necessary settings, permissions, and features that your app will use to interact with Slack.
By using an app manifest, you can easily deploy and configure your Slack app with a single file, ensuring consistency and simplifying the setup process.
Below is the configuration for your Slack application. This YAML file outlines the essential components and permissions needed for the bot to function correctly.
display_information:
  name: Zenduty Incident Slackbot
features:
  bot_user:
    display_name: Zenduty Incident Slackbot
    always_online: false
  slash_commands:
    - command: /zenduty-bot
      url: <your application URL>/slack/events
      description: Invoke Zenduty Bot for Incident Management
      should_escape: false
oauth_config:
  scopes:
    bot:
      - commands
      - chat:write
settings:
  interactivity:
    is_enabled: true
    request_url: <your application URL>/slack/events
  org_deploy_enabled: false
  socket_mode_enabled: false
  token_rotation_enabled: false
Explanation
-
display_information: Here, you'll provide thenameof your Slack application. -
slash_commands: Lists the slash commands that your bot will respond to. Theurlfield is the endpoint where Slack will send the command payload. This should point to your app server's URL where you handle the events.So if you're running your app on a platform like Glitch or Replit, use the provided URL from that platform for the Request URL. Or alternatively, if you can run your app on your own machine (localhost) and use something like ngrok to expose it. In that case, replace the URL with the ngrok URL, which will forward requests to your local server.
-
oauth_config: The scopes defined the permissions that the bot needs.commandsallows the bot to execute slash commands, andchat:writeallows the bot to post messages in a Slack channel. -
settings: Over here,interactivityneeds to be enabled to allow the user to interact with components, like modals. Slack will then send interactive component payloads (e.g., when a user submits a modal) torequest_url.
By default, Bolt.js listens for all incoming requests at the
/slack/eventsroute, so for the Request URL you can enter your app's URL appended with/slack/events.
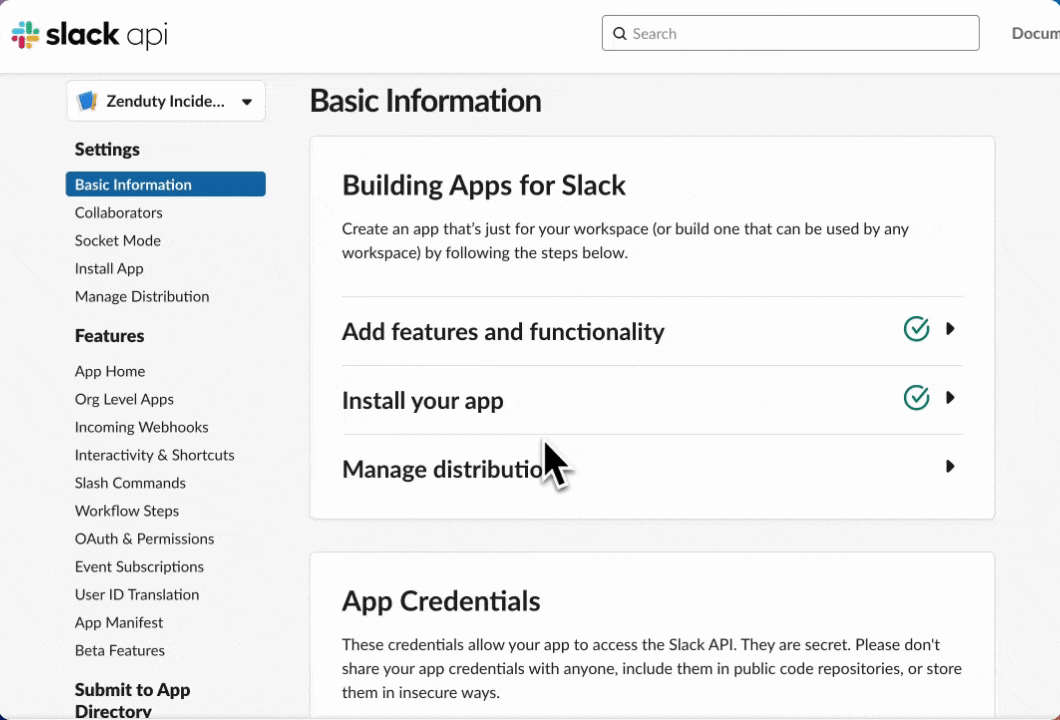
Once you've set the above up, you'll need to install the app to your workspace.
Step 2: Implementing the command handler code to invoke the bot
On Slack, a slash command lets users summon your bot by typing a specific string into the chat box. Think of it as a shortcut. By enabling slash commands, your app can be conjured up from any conversation in Slack, ready to do its thing.
In this step, you'll define a command handler so that when a user types /zenduty-bot create, it triggers the bot to display a modal where users can enter details for a new incident. Here's how it works:
- Retrieve the list of services using the Zenduty API.
- Construct a Slack modal dialog using the services list.
- Display the modal on Slack.
async function displayNewIncidentModal({ack, command}) {
    ack();

    try {
        const commandName = command.text;
        const channelId = command.channel_id;
        const botToken = command.token;
        const triggerId = command.trigger_id;

        if (commandName === 'create') {
            const services = await getServicesForTeam();
            const slackModal = buildNewIncidentForm(channelId, services, 'create_incident');

            const viewOpenResponse = await slackApp.client.views.open({
                trigger_id: triggerId,
                view: slackModal,
            });

        } else {
            const message = `Invalid command: ${commandName}`;
            const chatMessageResponse = await slackApp.client.chat.postMessage({
                text: message,
                channel: channelId,
            });
        }
    } catch (error) {
        console.error(error);
    }
}

slackApp.command('/zenduty-bot', displayNewIncidentModal);
What does the above code do?
{ack, command}: Acknowledge function to respond to the Slack action, and the command payload from Slack containing details like the command text, channel ID.- The
buildNewIncidentFormfunction creates a modal view for incident creation in Slack. It defines the structure of the modal, including form input fields for selecting a service, urgency level, incident title, and summary.
In this function, we takes a list of services as input, which is used to populate a dropdown list in the modal, allowing users to select a service easily. - While constructing the modal view, we assign it an ID
create_incident. This ID can be used to uniquely identify and listen to interactions with that particular view later, such as a form submit.
You can refer to Slack's documentation on constructing modals for more details.
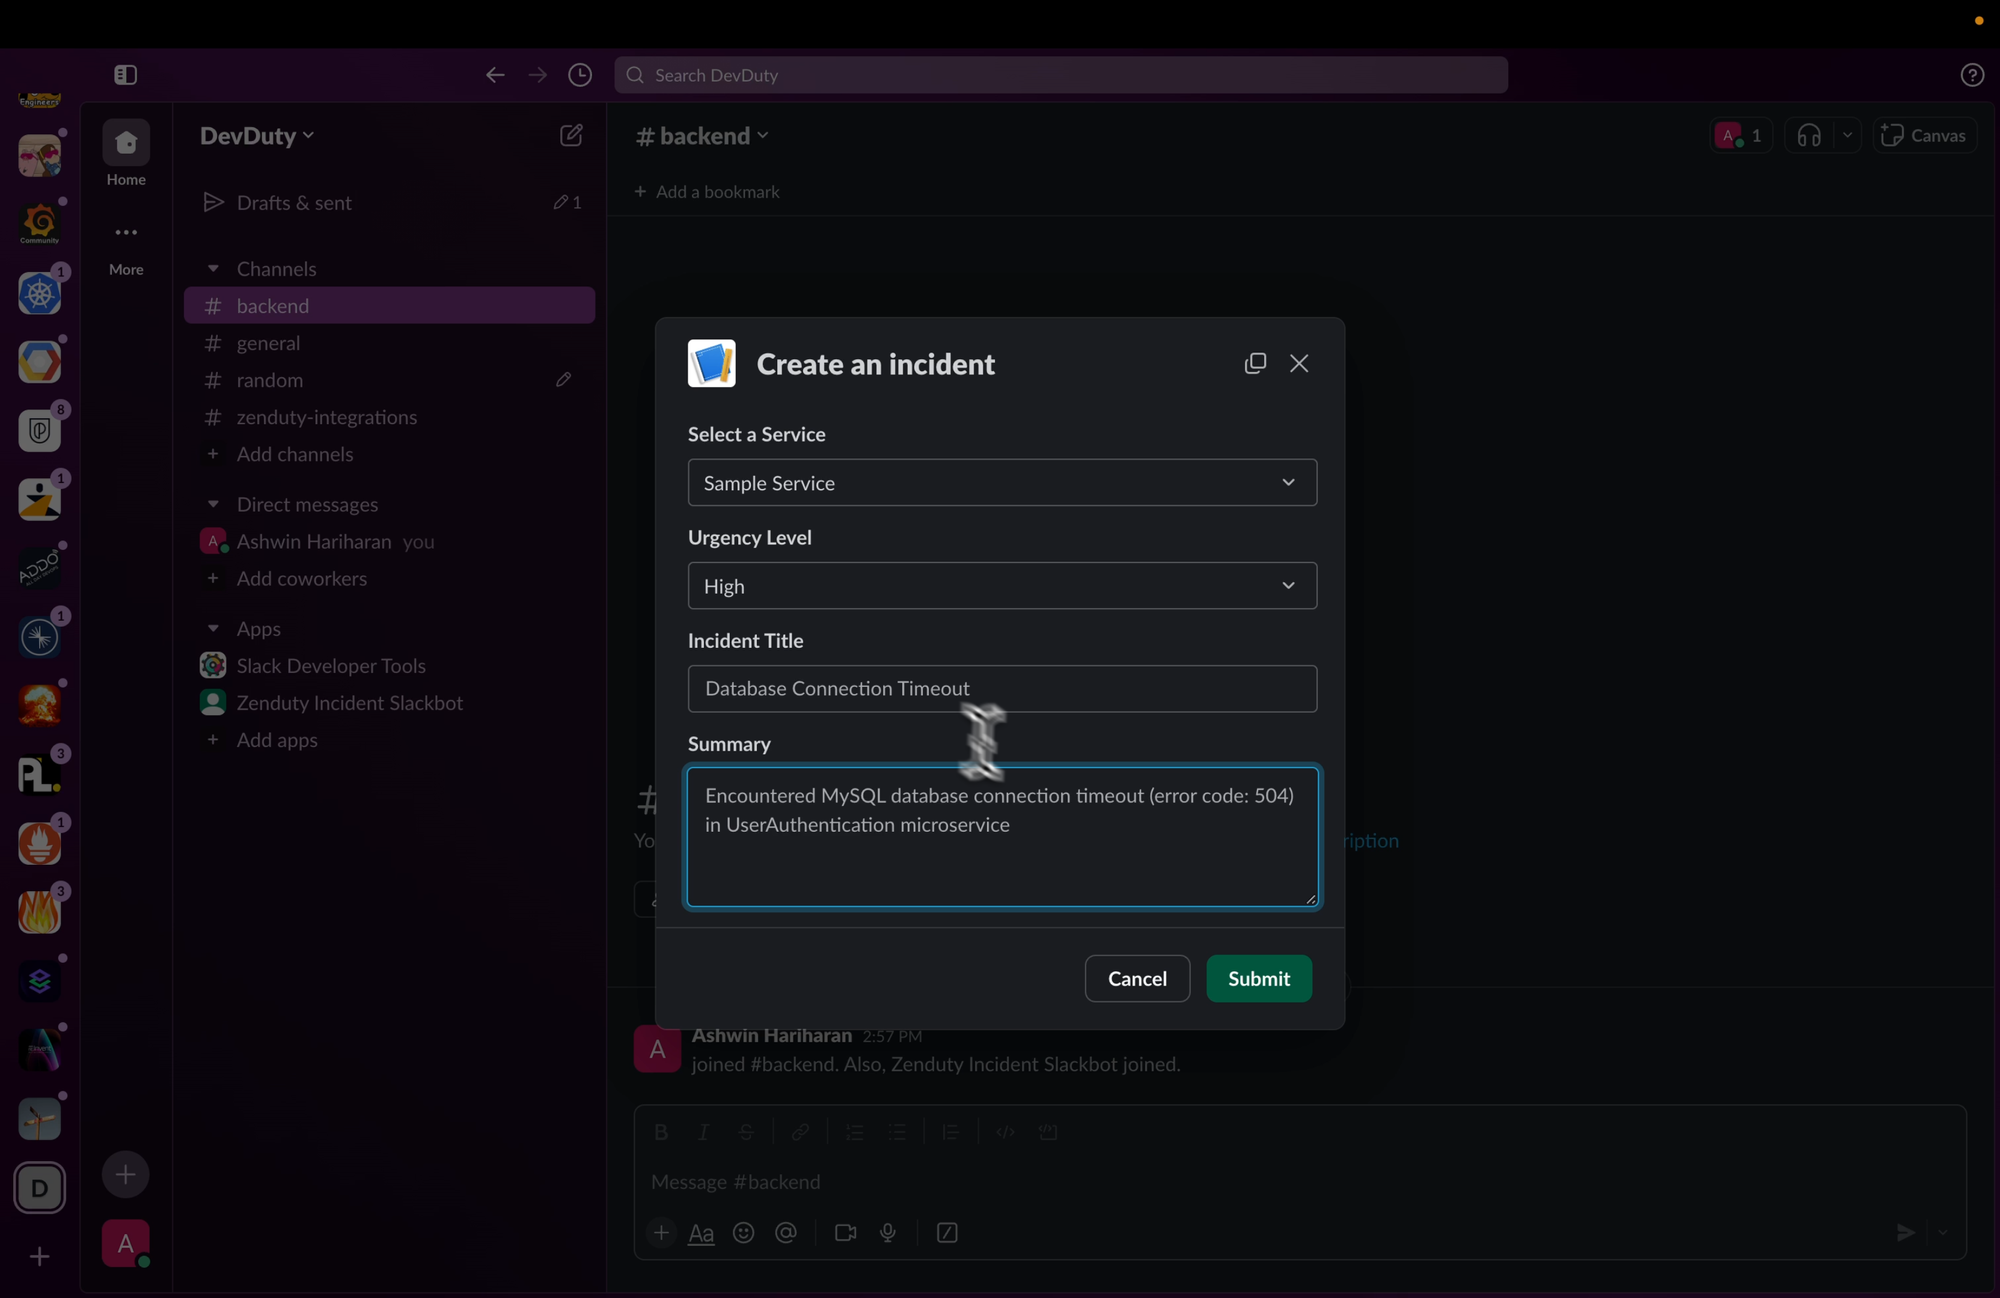
Now, go ahead and type the command /zenduty-bot create. Slack should respond by displaying the incident creation modal in your workspace, looking something like this:
Step 3: Handle form submit on slack
In this step, you'll handle the form submission from the Slack modal. This involves creating an incident in Zenduty using the information provided by the user in the modal and then displaying a confirmation message in Slack. Here's how it works:
- When user clicks on Submit, retrieve the incident details provided by the user from the modal view.
- Extract the form data containing the incident details, and send it to Zenduty's API to create a new incident
- Post a confirmation message in Slack with the incident details.
async function createIncidentOnZenduty({ ack, body, view}) {
    await ack();

    try {
        const channelId = view.private_metadata;
        const triggeredBy = body.user.name;
        const triggeredById = body.user.id;
        const workspace = body.team.domain;
        const triggeredByUrl = `https://${workspace}.slack.com/team/${triggeredById}`;

        const values = view.state.values;
        const service = values.service_id.service_id.selected_option.value;
        const title = values.title.title.value;
        let summary = values.summary.summary.value;

        summary += `\n Triggered by ${triggeredBy}: ${triggeredByUrl}`;
        const urgency = parseInt(values.urgency.urgency.selected_option.value);

        const incidentPayload = {
            title,
            summary,
            user: null,
            escalation_policy: null,
            service,
            urgency,
        };

        const responseMessage = await createIncident(incidentPayload, triggeredBy);

        const chatMessageResponse = await slackApp.client.chat.postMessage({
            text: responseMessage,
            channel: channelId,
        });

    } catch(error) {
        console.error(error);
    }
}

slackApp.view('create_incident', createIncidentOnZenduty);
What does the above code do?
- The view's ID
create_incidentused in the previous code allows us to listen for and handle submissions from the specific modal. When a user fills out the modal and submits it, this ID enables us to process the submission. - Extract the user's inputs from the
viewobject in the payload. This includes details like the selected service, incident title, and summary. These inputs are used to create the data required for the incident. - The
createIncidentfunction sends aPOSTrequest to Zenduty's API with the incident payload. This payload includes the title, summary, selected service, and urgency level. - If the incident creation is successful, a confirmation message with the incident details is sent back to the specified Slack channel using
slackApp.client.chat.postMessage. This lets the user know that their incident was successfully created.
That's it! Save your code, restart your application server, and watch your new bot in action!
Conclusion
You've just leveled up your incident management game by integrating a custom Slack bot with Zenduty. Instead of scrambling through different tools and platforms, your engineers can calmly type a command in Slack, fill out a simple form, and voilà! Your incident is created, and the relevant people on-call are notified. You've transformed what could have been a stressful process into a streamlined, efficient one.
This integration is just one of the many use cases you can build with the Zenduty API. Is there any other use case you would like to learn about? Let us know, and we'll help you figure it out.
Happy coding, and may your incidents be few and far between!

