
Unifying Internal Response and External Communication with Zenduty + StatusCast

Last updated
When an incident hits, two things need to happen right away. Your team needs to know, and your users need to know. Most teams split that into two separate workflows. One for alerting and escalation. One for status updates and communication. And during the incident, you can feel the gap between them.
Your on-call team gets alerts through Zenduty. Meanwhile, someone has to remember to log into StatusCast, write a quick update, push it live, and keep it updated as things change. Or worse, it doesn’t happen until users start asking what’s going on.
This slows things down, causes confusion, and leads to duplicated effort while everyone’s already under pressure.
That’s why we built the Zenduty and StatusCast integration. It connects your alerting and response with your external comms. Incidents sync both ways. One update flows across both systems. The loop is closed without extra steps.
In the next section, we’ll break down exactly how this integration works and what’s happening behind the scenes each time an incident fires.
How the Integration Works
The Zenduty and StatusCast integration keeps both tools in sync without anyone needing to switch tabs. It connects the two parts of your workflow that usually drift apart during an incident.
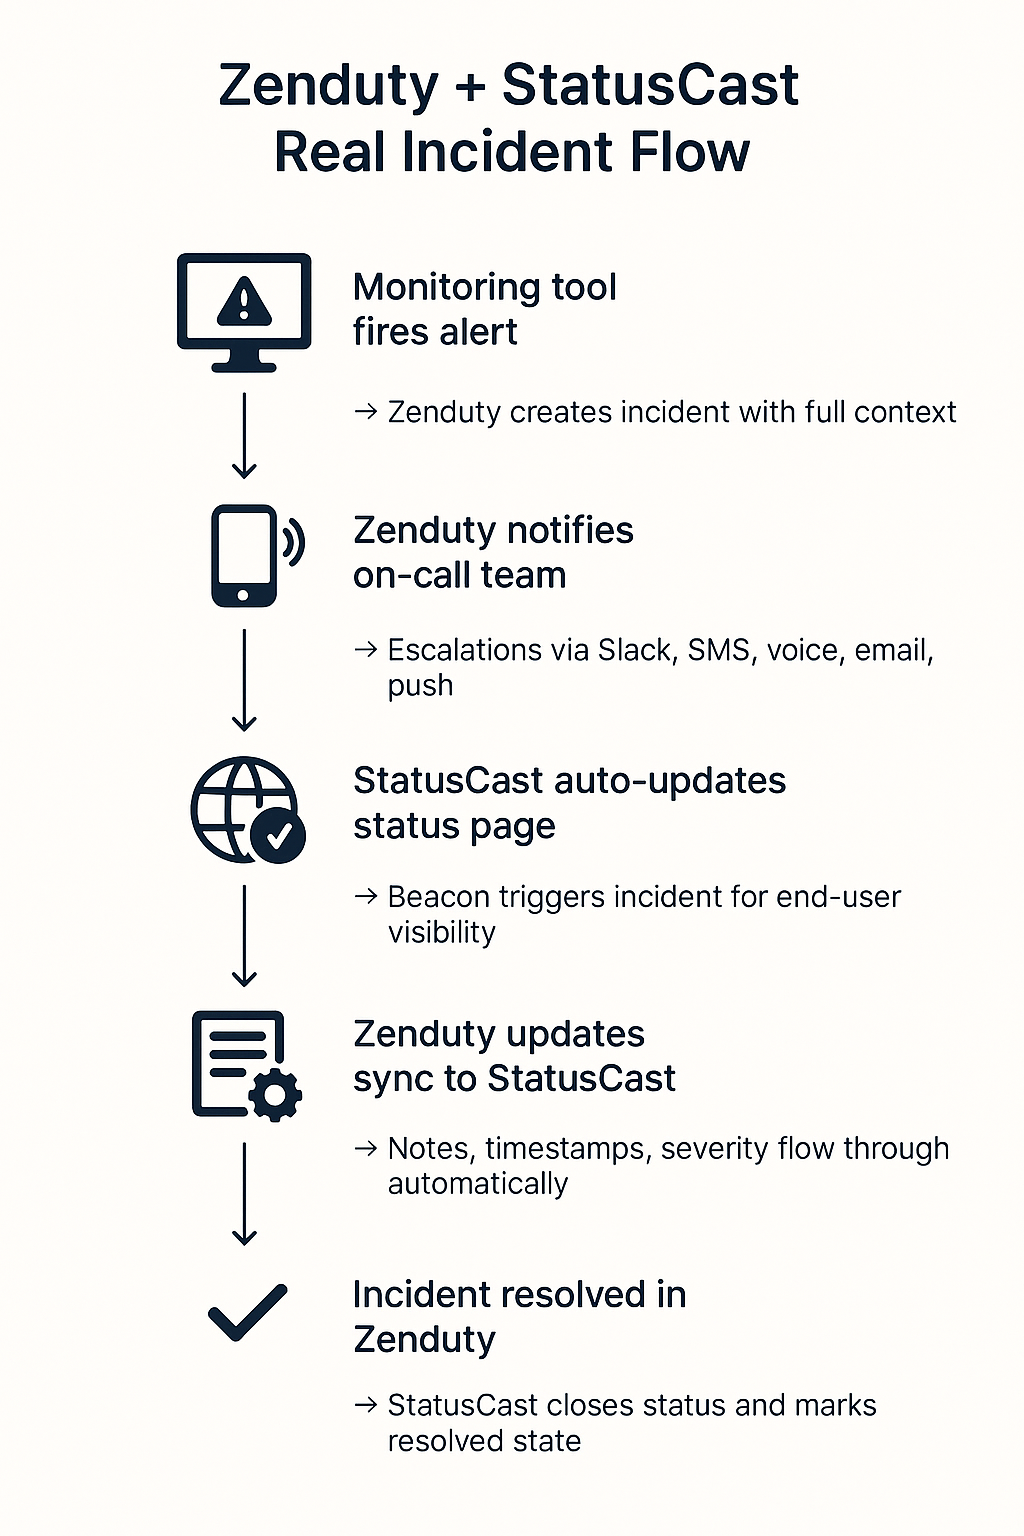
If an incident starts in StatusCast, Zenduty automatically picks it up. It triggers an alert, pulls in the context, and notifies your on-call team through their preferred channels. That includes SMS, voice, email, Slack, Teams, or push. Escalations keep running until someone acknowledges.
If the incident starts in Zenduty, it updates StatusCast. Your status page goes live with the right incident state. Users see that something’s wrong without asking. And when the incident gets resolved in either tool, the other one closes it too.
You can also control how incidents behave. Match services by name. Set Alert Rules in Zenduty to auto-route, suppress noise, or trigger different updates based on severity. That means you can tune exactly what gets posted and when without needing to touch both systems.
Everything you’d usually update twice, now happens once.
Next, we’ll look at what this actually improves in your workflow once it’s running in production.
What Changes in Your Incident Workflow
The biggest shift is that incidents don’t break your team’s focus anymore.
Your engineers stay inside Zenduty. They acknowledge, escalate, and respond. The comms side stays in StatusCast. Updates go out when they need to. Nothing is delayed, nothing is forgotten, and no one has to nudge someone else to post an update during peak load.
It also keeps post-incident work lighter. When timelines are synced and nothing got missed in the heat of the moment, your postmortem starts clean. You don’t waste time chasing screenshots or status logs to piece things together.
This is how it should work. You handle the incident. The systems stay in sync. The users stay informed.
How to Set Up the Zenduty + StatusCast Integration
You only need a few things to get this working. The two systems talk to each other using webhooks. You configure a few values, map services by name, and test the flow.
1. In Zenduty(Account Settings):
- Navigate to Account Settings → Connections.
- Select StatusCast, then click Add Domain.
- Enter the domain name of your StatusCast account.
- If signature verification is required, enable Check Signature.
- Follow the StatusCast setup steps to get the public and private keys.
- Paste the corresponding keys into the required fields.
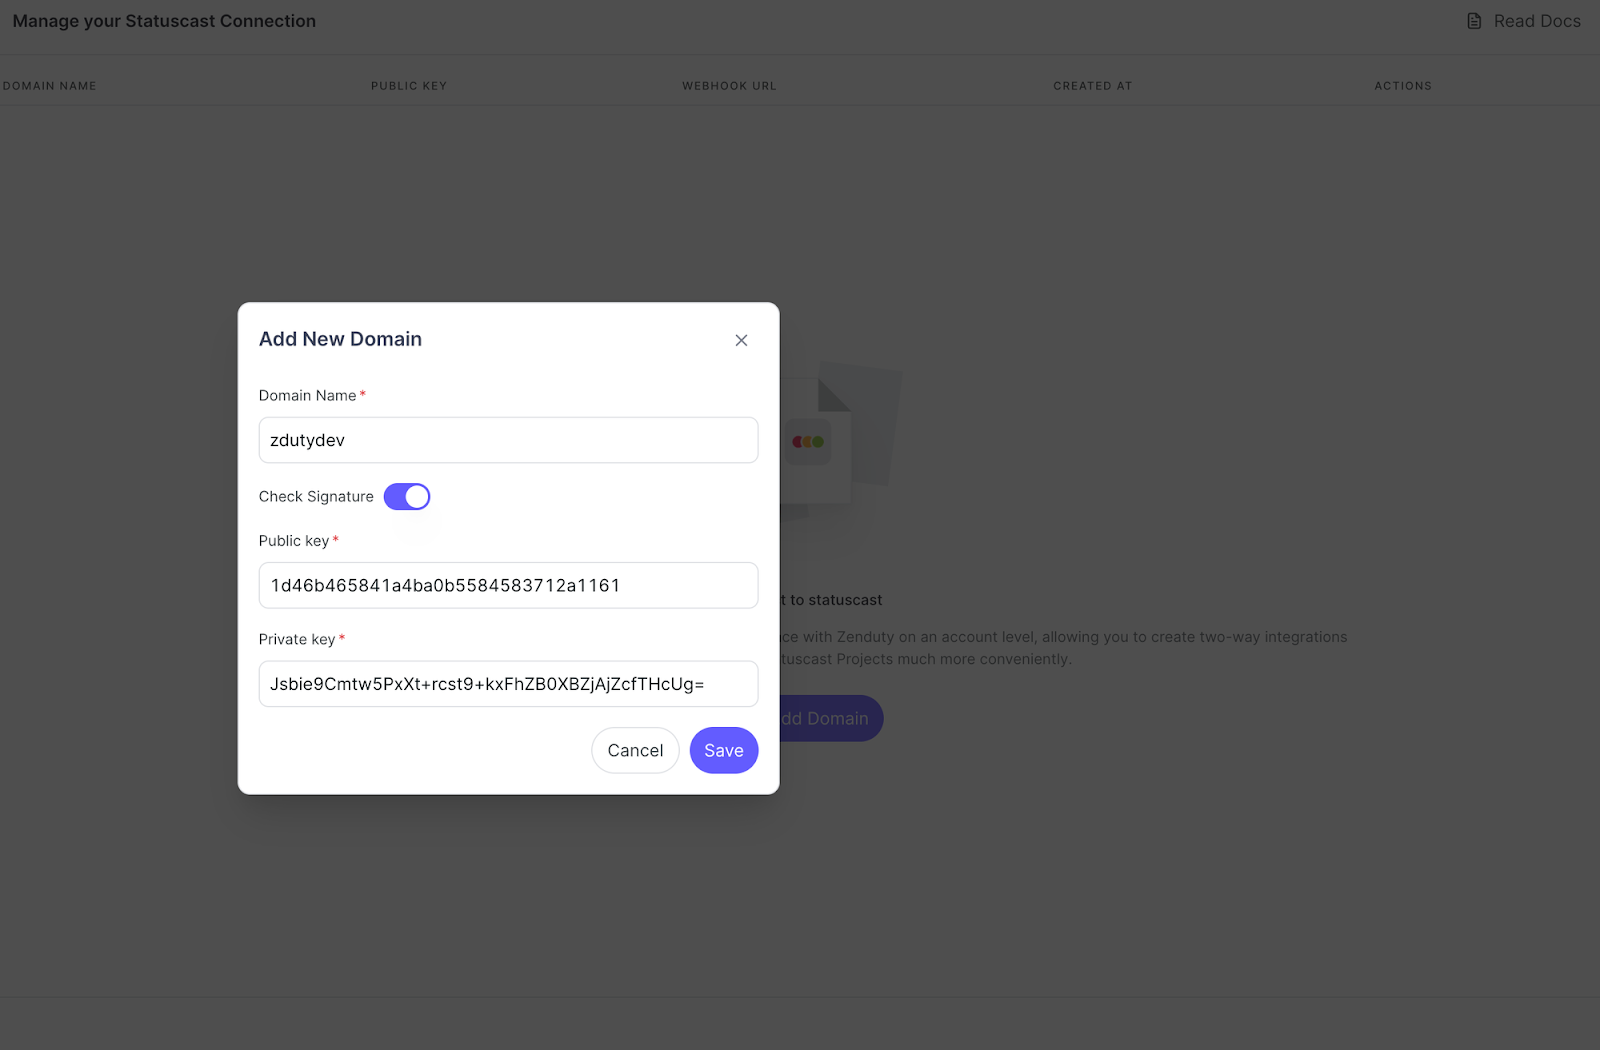
- Click Save to complete the setup.
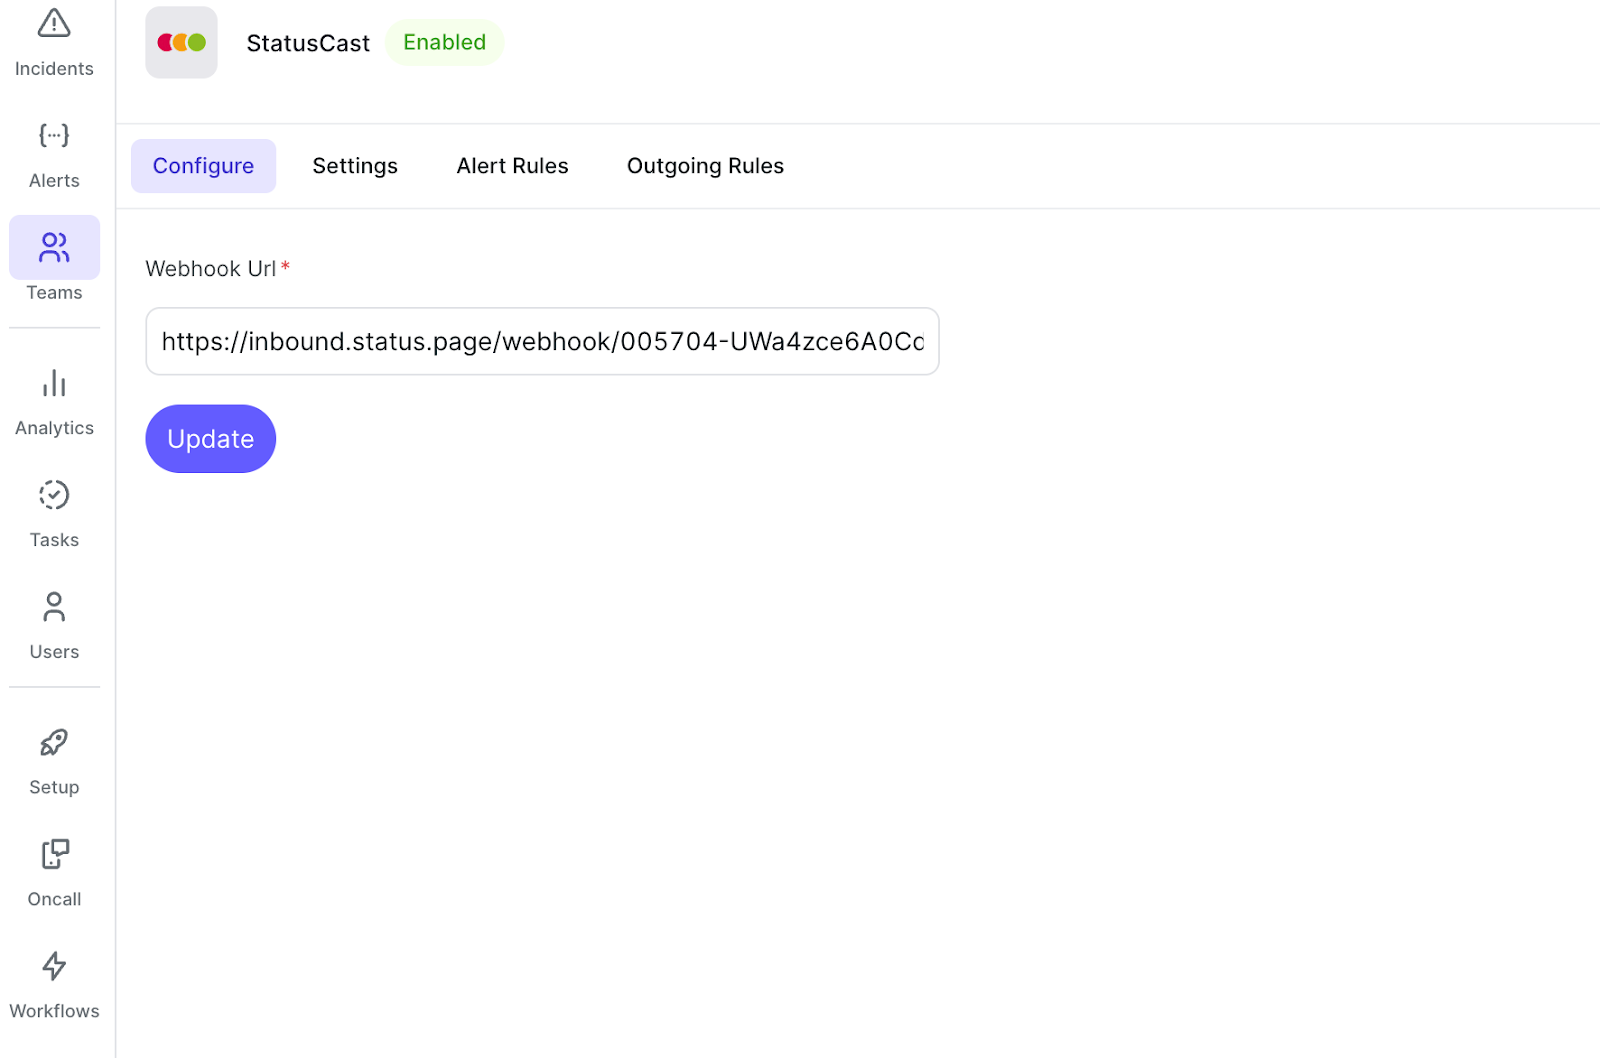
- After saving, you will see the Webhook URL.Please copy and save this URL for future use during the StatusCast configuration.
2. In StatusCast:
- Navigate to Settings -> Integrations.
- Install or Configure Webhook.
- If you plan to enable Use Signature Header, make sure to do this step before the Zenduty setup.
- Enable Use Signature Header and copy the Public Key and Private Key (these will be needed in Step 4 of the Zenduty setup).

- Paste the Webhook URL from Zenduty, and click Save.
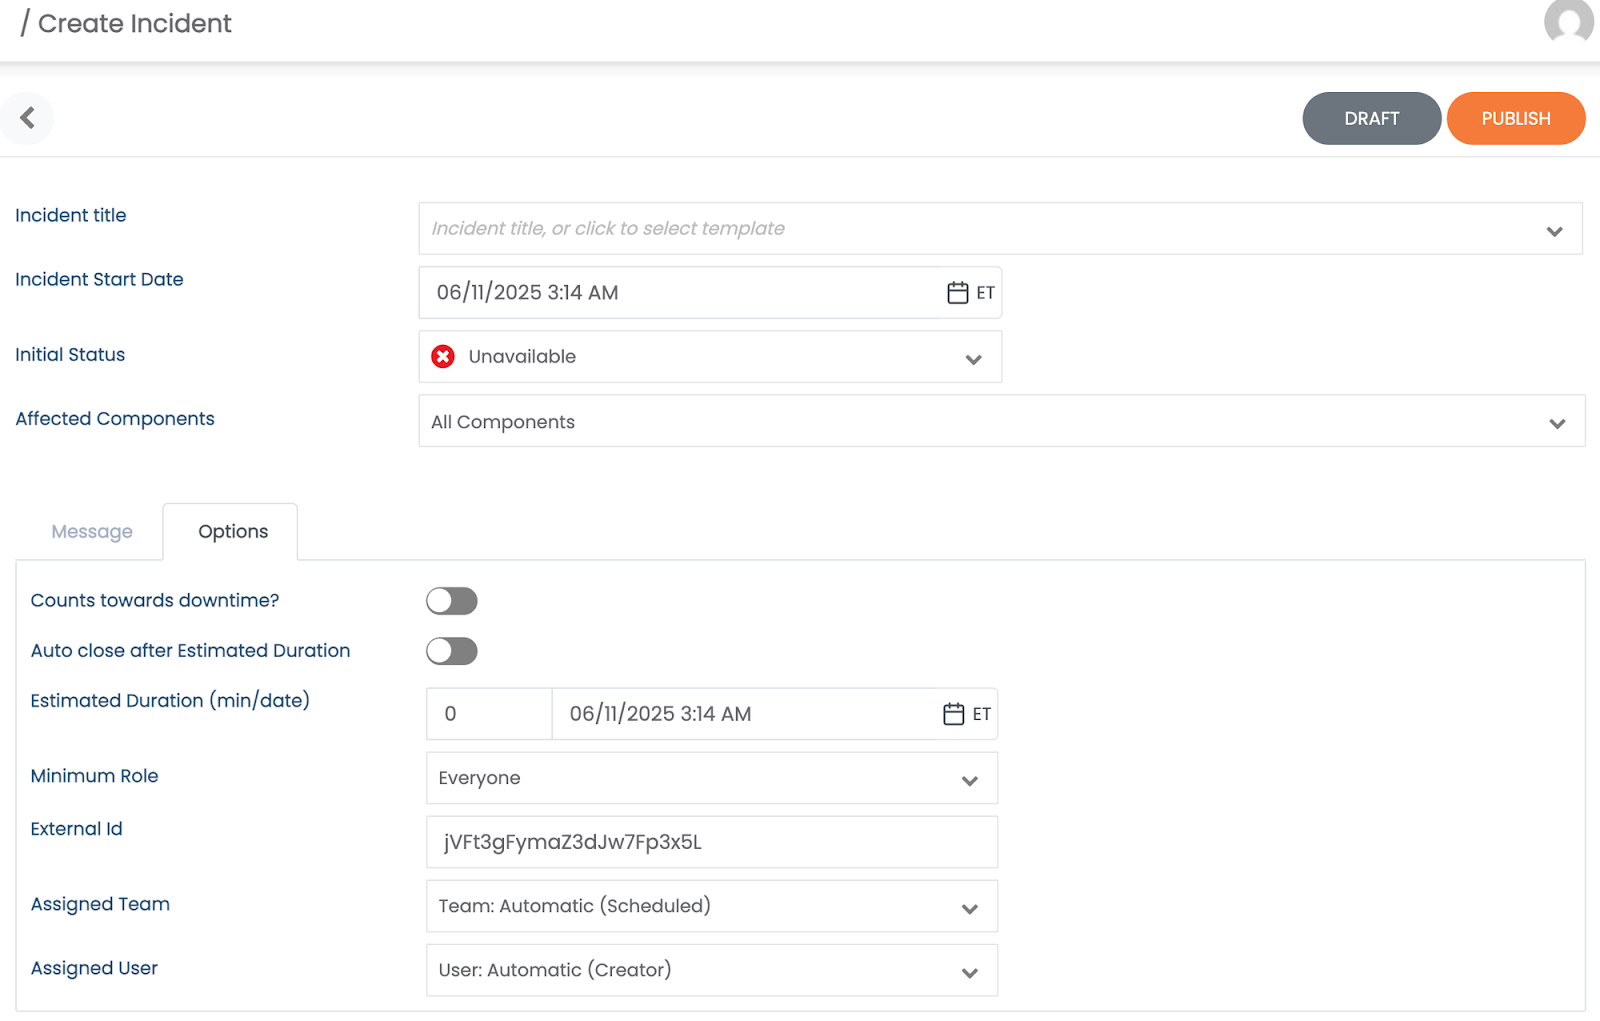
- Navigate to Settings -> Settings, then select Beacons.
- Click New Integration.
- Enter the Beacon Name.
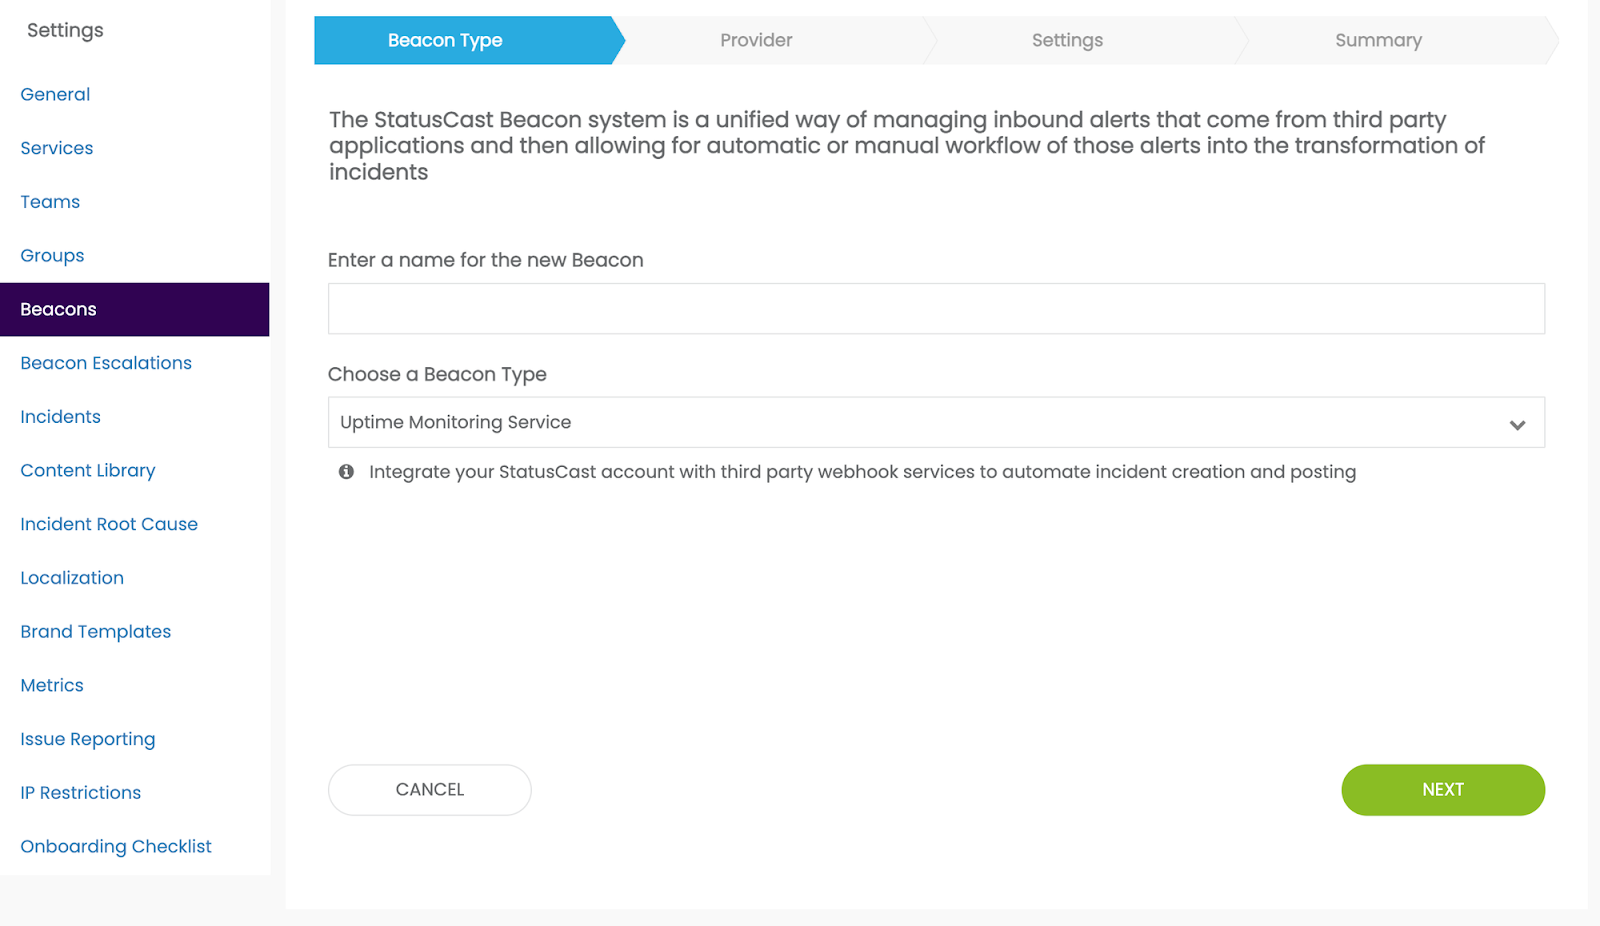
- Select Uptime Monitoring Service as the Beacon Type and click Next.
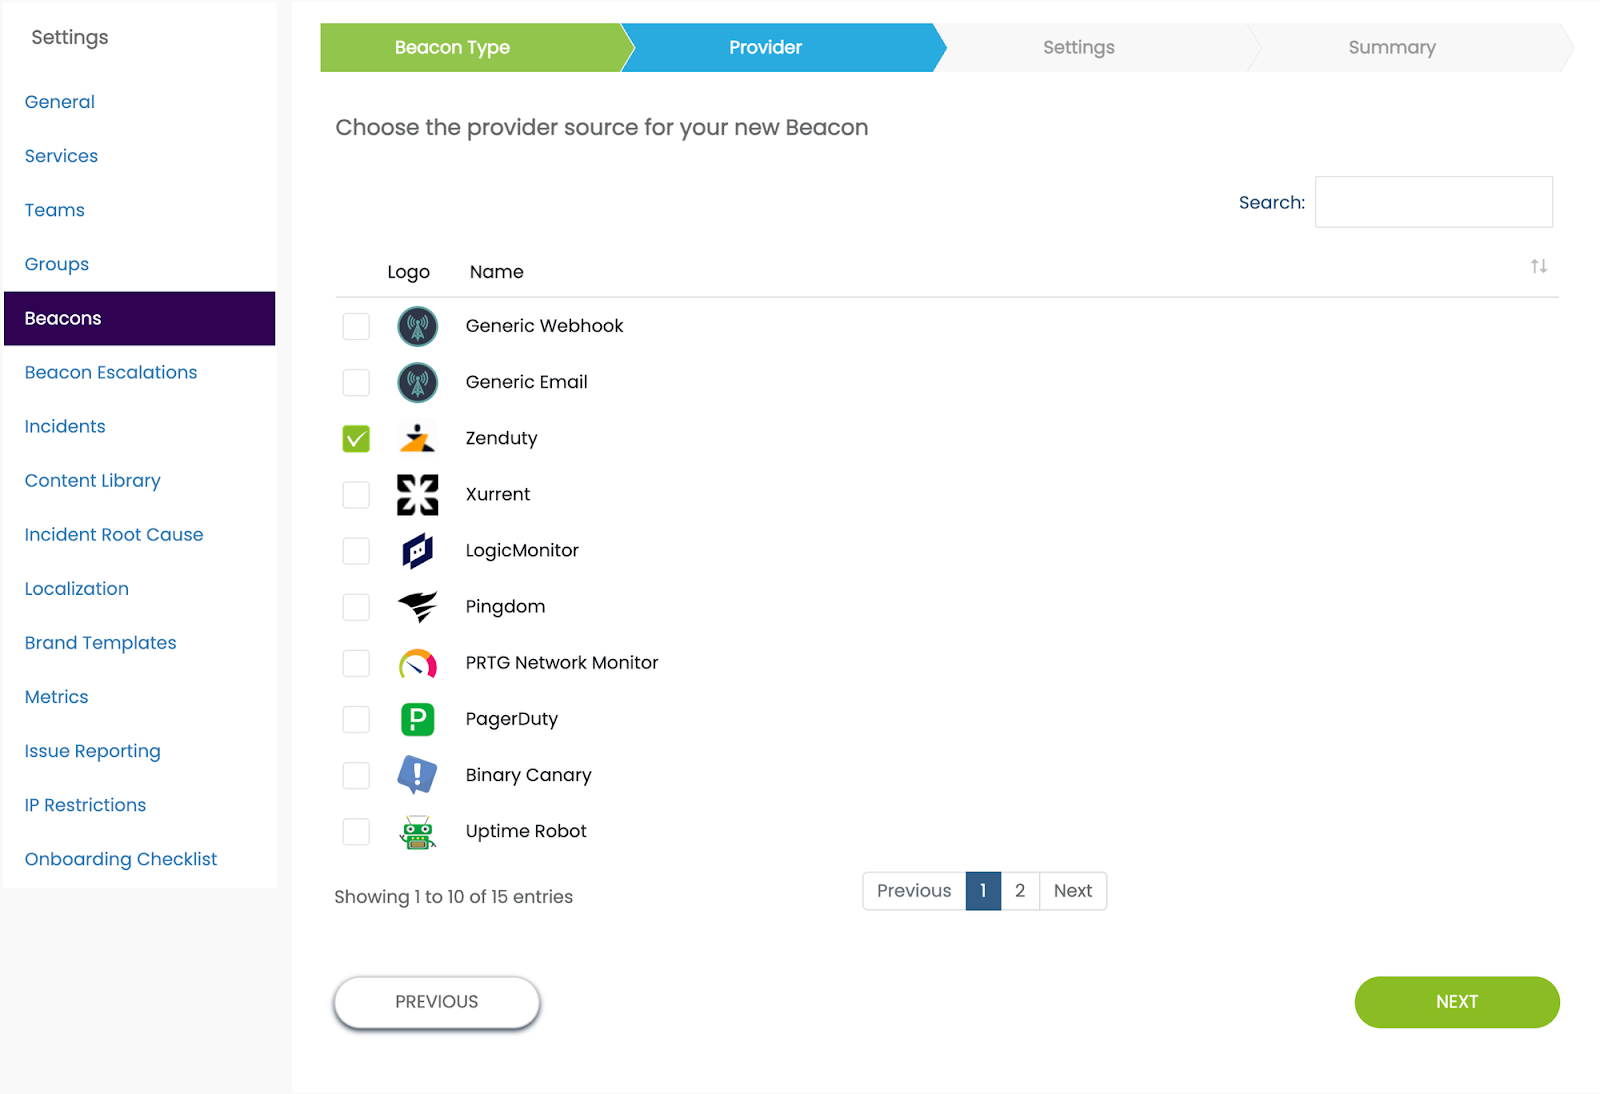
- Choose Zenduty as the provider and click Next.
- Select the user you want to assign the beacon to and click Next.
- Preview the integration details and click Submit.
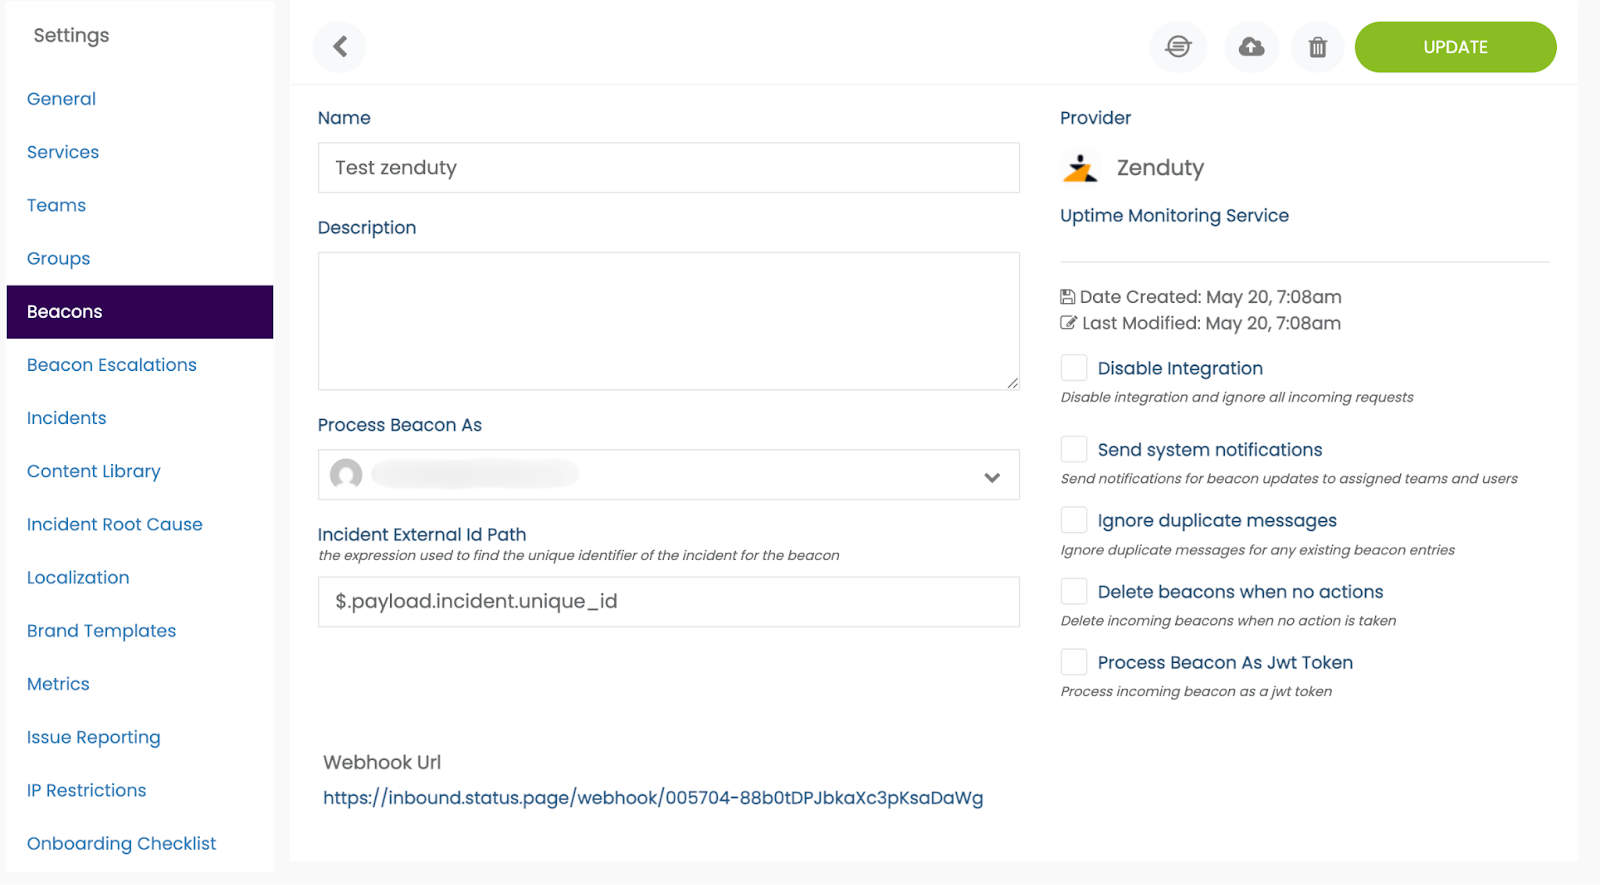
- Copy the displayed Webhook URL and save it.
3. Back in Zenduty
- In Zenduty, navigate to the Teams section where you want to create the integration.
- Under the selected team, go to Services.
- Create a new service using the exact same name as in StatusCast (note: the name is case-sensitive, so enter it carefully).
- Inside the service, click on Add Outgoing Integration.
- From the list, select StatusCast.
- Click Add Integration.
- Paste the Webhook URL you copied from StatusCast.
- Click Save to complete the integration.
Final Check
Incidents should now sync both ways between Zenduty and StatusCast. Make sure your incidents include an external_id when created from StatusCast. That’s required for the sync to work.
You can test both flows by triggering incidents manually or from a monitoring tool.
What This Looks Like During a Real Incident
Your database monitoring tool fires a high-latency alert. Zenduty creates an incident and routes it to the on-call backend team. They get alerted through Slack and SMS. One engineer acknowledges and starts digging in.
That incident is already synced with StatusCast. The status page is live. Customers know there’s a database issue. They don’t need to ask. They don’t need to file tickets. Support isn’t guessing.
As the investigation progresses, updates are added to the Zenduty timeline. Those updates flow through to StatusCast automatically. The team doesn’t stop to post updates manually. They stay focused on debugging and rollback.
Once the root cause is identified and the fix is deployed, the engineer resolves the incident in Zenduty. That closes the loop on StatusCast. The status page shows the incident is resolved. The incident lifecycle is complete on both sides. The timestamps match. The timeline is clean.
No one has to backfill anything. No one has to ask what got missed. The team handles the incident. The integration handles the communication.
Next, we’ll show you how this integration actually came together and how we built it to handle the edge cases you’d expect in production.
How We Built It
We needed both systems to talk like they were in the same room. StatusCast fires an incident, Zenduty picks it up and alerts the team. Zenduty resolves it, StatusCast closes the status page. No loops, no missing updates.
We started with pre-config on both sides. Zenduty sends a webhook. StatusCast maps the payload through a beacon. Everything depends on exact service name matching and clean field mapping. If something’s off by even a character, it doesn’t fly.
Mahesh, who built most of this, said
“It was great working with the StatusCast team to get this live. The webhook flows were solid. We just had to make sure no payloads got lost in translation. You’d be surprised how opinionated systems can get about field order.”
Once the edge cases were locked down, the sync ran smooth. Alerts fire, pages update, timelines stay aligned. Just the way it should be.
Now that it’s live, it just works. You handle the incident. The tools handle each other.
Try the Integration
If you’re using Zenduty and not yet using StatusCast, this makes your incident comms automatic. Your users stay updated while your team stays focused.
If you’re using StatusCast and not yet using Zenduty, this gives you automated response with full context, escalations, and no missed alerts.
Now both can work together.
Set up the integration and run a test. Or sign up for Zenduty to try it out with your team.
It only takes a few minutes to plug in. The time you’ll save during incidents is much more.
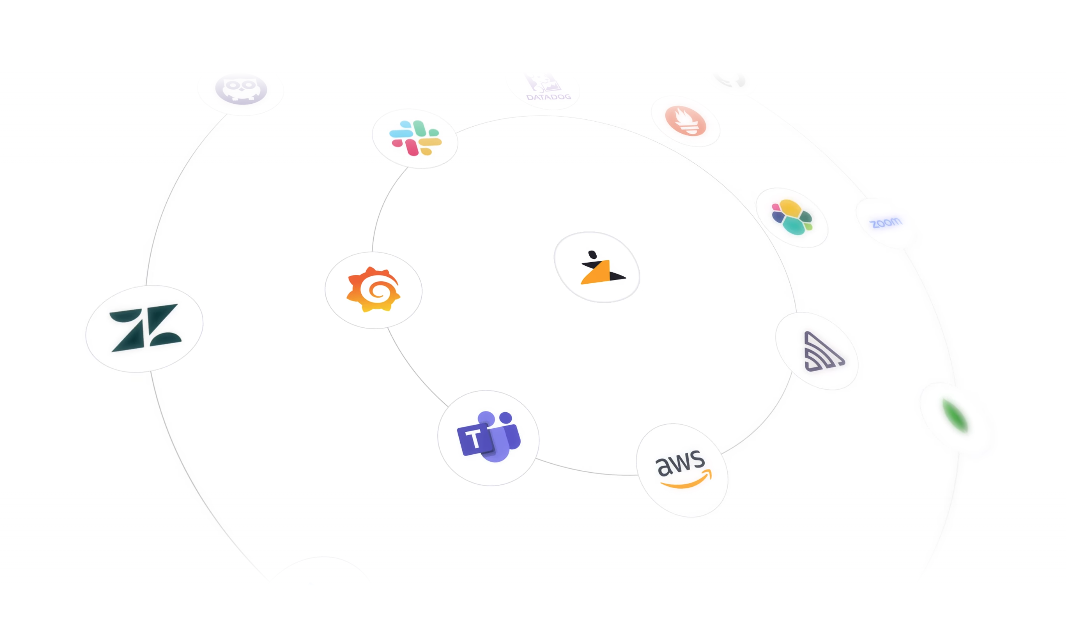
Zenduty integrates with all your fav tools. With over 150+ integrations, fix incidents within tools you already use. Explore the full list here.

Rohan Taneja
Writing words that make tech less confusing.
